Authentication
Identity360's APIs use the industry-standard OAuth 2.0 protocol for authentication and authorization.
This protocol delegates user authentication to the service hosting the user account and authorizes third-party applications to access the user account. Each API request must include an OAuth token to retrieve any resource from Identity360.
Why should we use OAuth 2.0?
- Clients are not required to support password authentication or store user credentials.
- Clients gain delegated access, meaning access only to resources authenticated by the user.
- Delegated access can be revoked at any time.
- OAuth 2.0 access tokens expire after a set period. If the client experiences a security breach, user data will be compromised only until the access token expires.
Terminologies
The following are some terms you need to know before you start using the Identity360 APIs.
- Protected resources
- Identity360 resources that include users, groups, and more.
- Resource server
- The Identity360 server that hosts protected resources.
- Resource owner
- Any end user of your account who can grant access to the protected resources.
- Client
- An application that sends requests to the resource server to access protected resources on behalf of the end user.
- Client ID
- The consumer key generated from the connected application.
- Client secret
- The consumer secret generated from the connected application.
- Authentication server
- The authentication server provides the necessary credentials (such as access and refresh tokens) to the client. In this case, it is the Identity360 authentication server.
- Authentication code
- The authentication server generates a temporary token and sends it to the client via the browser. The client then sends this code to the authentication server to obtain access and refresh tokens.
- Access token
- A token sent to the resource server to access the protected resources of the user. The access token provides secure and temporary access to Identity360 APIs and is used by applications to make requests to the connected app. Each access token is valid for only one hour and can only be used for the operations specified in the scope.
- Refresh token
- A token that can be used to obtain new access tokens. It has an unlimited lifetime until it is revoked by the end user.
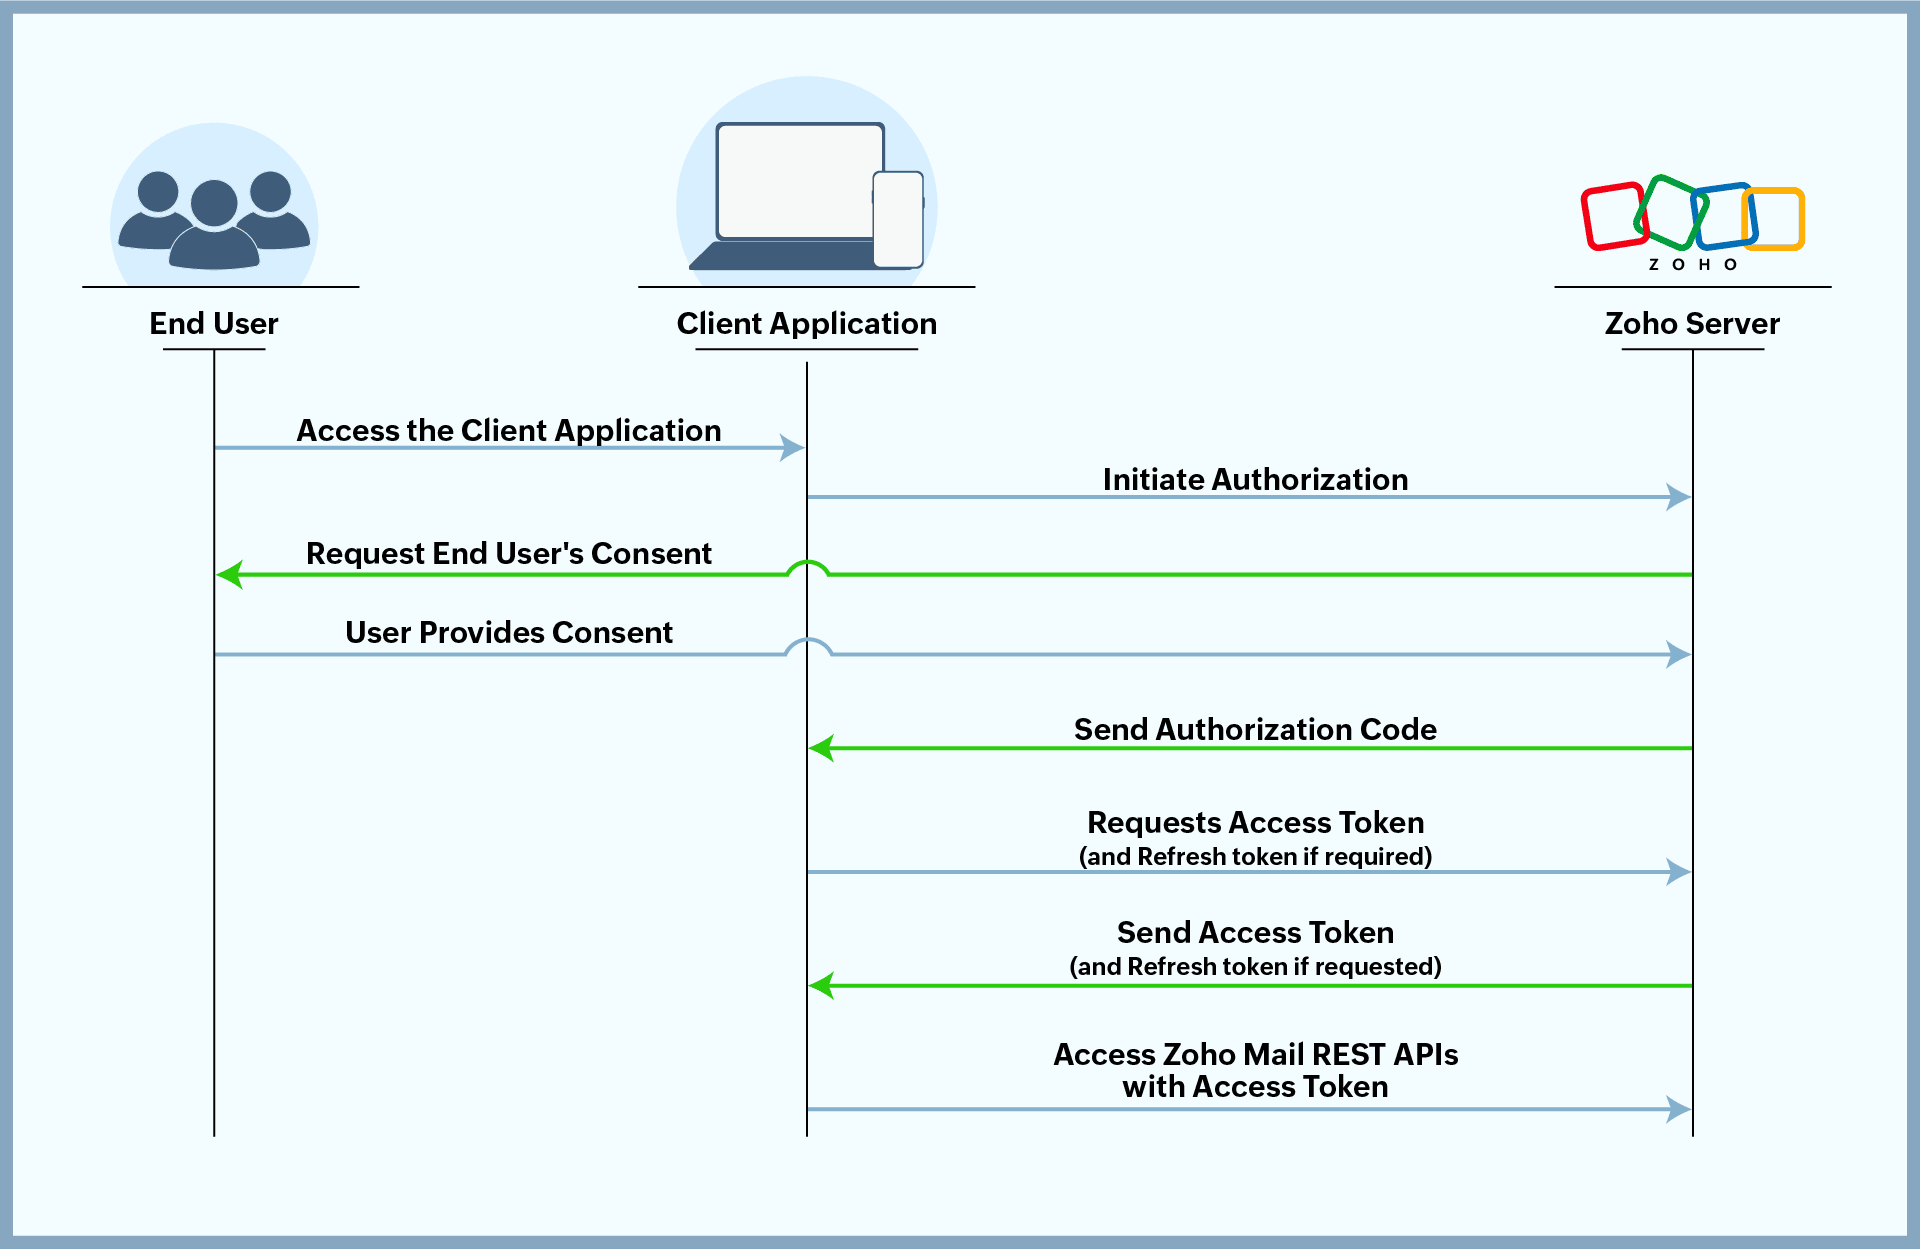
How does OAuth work?
The following steps will help you understand the OAuth 2.0 authentication process:
- The user opens the client application they want to use.
- The client application initiates authorization by requesting an authorization code with the required scopes.
- The Zoho server prompts the user to authorize the client application to access the user's data within the mentioned scopes.
- The end user authorizes the client application.
- The Zoho server sends the authorization code to the client application.
- The client application requests the Zoho server for an access token, for the mentioned scopes, in exchange for the authorization code.
- The Zoho server sends an access token (and a refresh token, if requested).
- The client application uses the access token to access resources from the Zoho server on behalf of the user. When the access token expires, the application uses the refresh token to obtain a new access token, ensuring uninterrupted access to resources until access is revoked by the user.
Follow the steps listed here, to access Zoho’s APIs using OAuth 2.0
1. Register your application
The first step in using OAuth is to register your client application with the Zoho API console. After
registration, you will receive a Client ID and Client Secret.
These are used to authorize the application's OAuth requests.
To register,
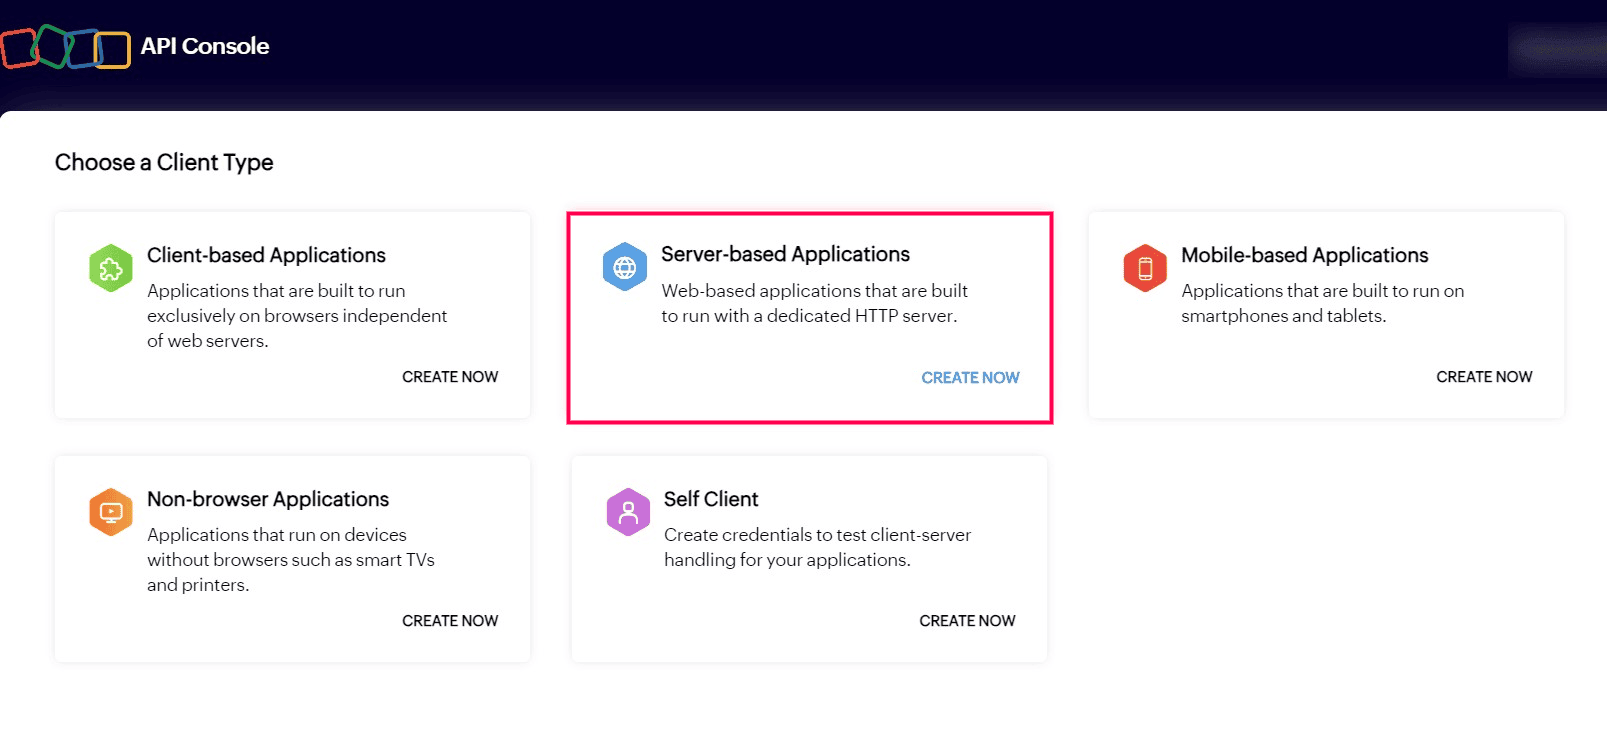
- Go to the Zoho Developer Console.
- In the Zoho API Console page, click on GET STARTED.
- Choose the type of third-party client application that is being registered:
- Client-based applications: Applications that run exclusively on a browser and are independent of a web server.
- Server-Based applications: Applications that are clients running on a dedicated HTTP server.
- Mobile-based applications: Applications that are installed on smartphones and tablets.
- Non-browser mobile applications: Applications for devices without browser provisioning such as smart TVs and printers.
- Self Client: These are stand-alone applications that perform back-end tasks, like data synchronization, without any manual intervention.
For more details, refer here.
Steps to register a server-based application:
Enter the following details:
- Client Name: The name of the client application you want to register with Zoho.
- Homepage URL: The URL of the client application's webpage.
- Authorized redirect URIs: A valid URL of the client application where Zoho Accounts sends you an authorization code after successful authentication.
- Click CREATE.

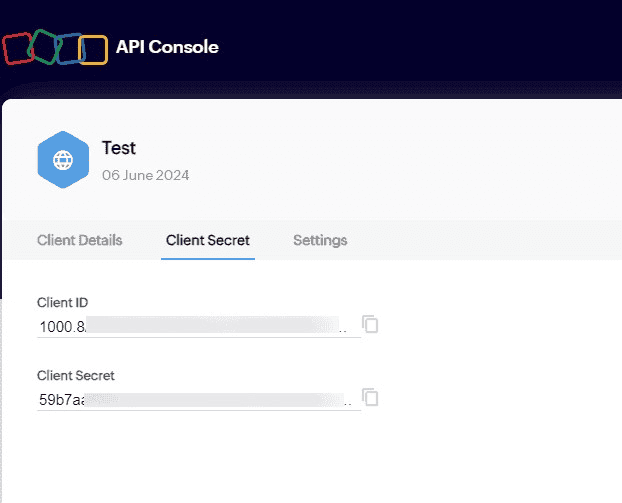
You will be provided with the Client ID and the Client secret. Using these credentials, you can go ahead with the OAuth 2.0 authentication.
2. Generating authorization code
The next step is to get an authorization code. For this, you will have to call the following Authorization URL with the mentioned query parameters
https://accounts.zoho.com/oauth/v2/auth?scope={scope}&client_id={client_id}&response_type=code&access_type={offline or online}&redirect_uri={redirect_uri}
| Parameter | Description |
|---|---|
| scope | SCOPE for which the token is to be generated. Multiple scopes can be given, which have to be separated
by commas. Ex : idmpod.user.READ |
| client_id | Client ID obtained during client registration |
| response_type | code |
| redirect_uri | One of the redirect URLs given in the above step. This parameter should be the same redirect URL mentioned while registering the Client. |
| access_type | The allowed values are offline and online. By default, it is set to online.
Online Gives your application an access token that is valid for one hour.Offline Gives your application
both an access token and a refresh token. |
| state | An opaque value used by the client to maintain state between the request and callback. |
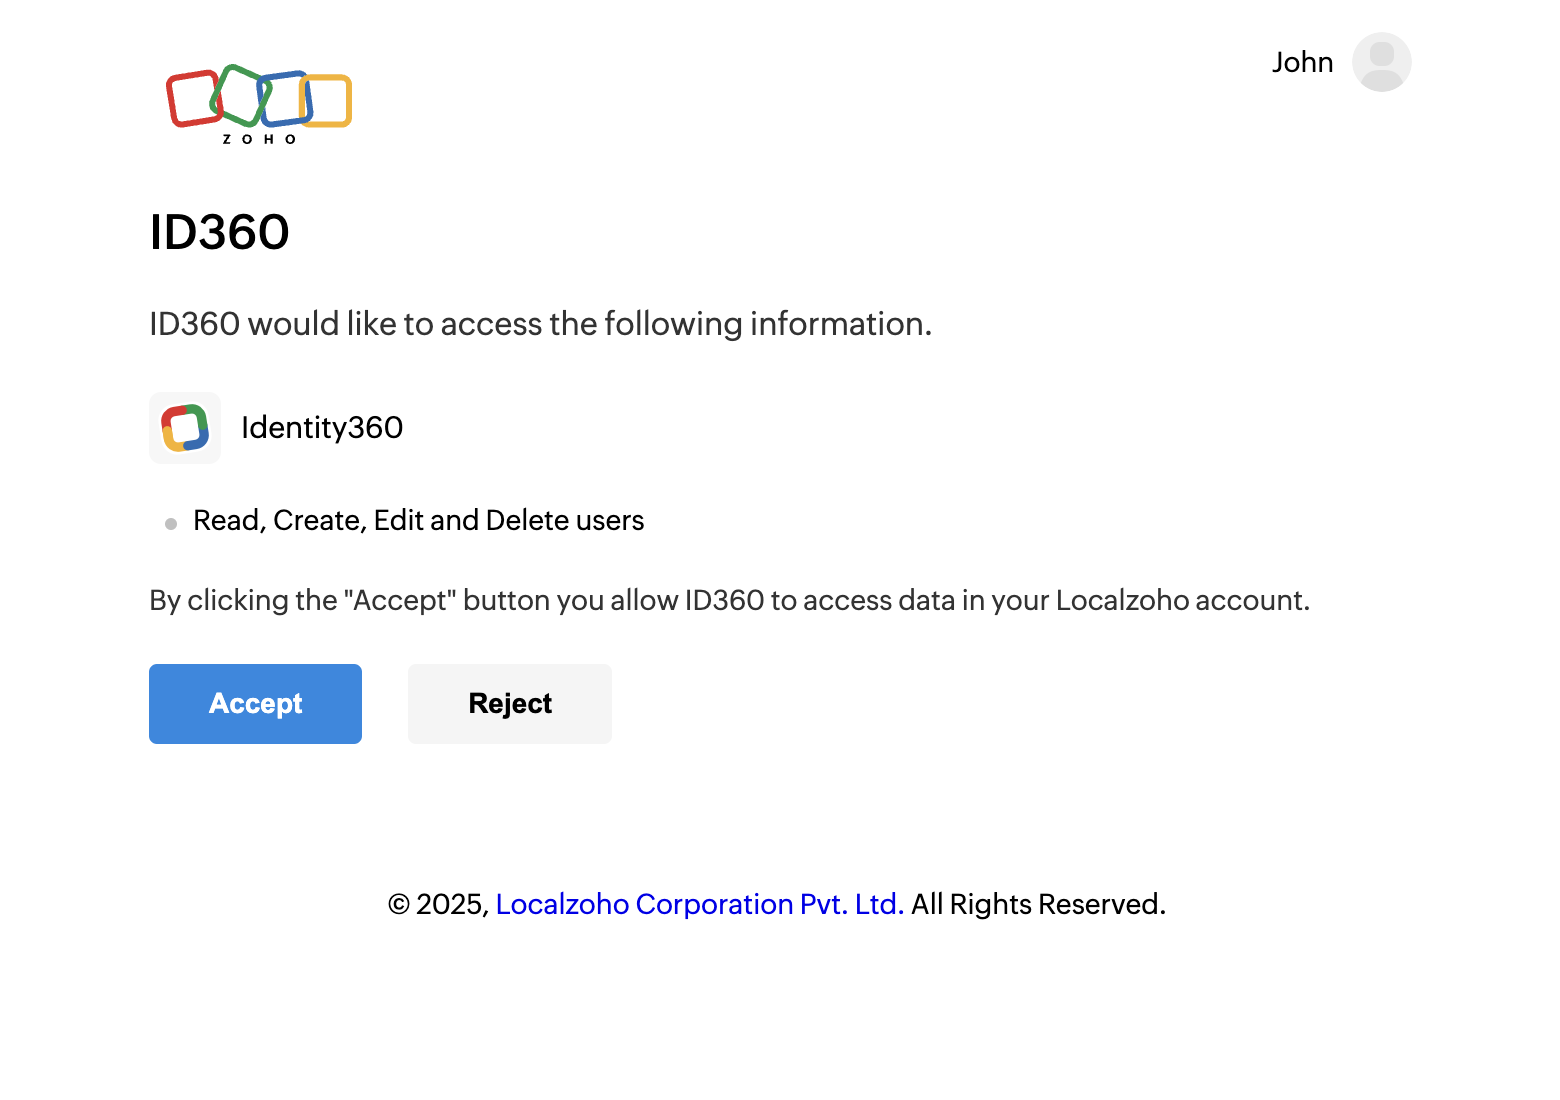
When you make this request, you'll see a "user consent page". Once you click
"Accept", Zoho will redirect you to the specified redirect_uri with the code and
state parameters.
https://{your_domain}.com/{your_redirect_page}?code={authorization_code}&location={domain}&accounts-server={accounts_url}
A back-end script from your end needs to store the following details from the above URL.
- code={grant_token}: This is used to generate access and refresh tokens.
- location={domain}: This tells you the domain of the user from which you have to make API calls.
- accounts-server={accounts_URL}: This is your account's URL, which you have to use to generate access and refresh tokens.
Note: The grant token is valid only for one minute.
If the user chooses to reject on the user consent page, the browser redirects to the redirect URI with the parameter error=access_denied, and your application is denied access to the user's data in Identity360.
https://accounts.zoho.com/oauth/v2/auth?scope=idmpod.user.READ&client_id=1000.0SRSxxxxxxxxxxxxxxxxxxxx239V&response_type=code&redirect_uri=https://id360.manageengine.com&access_type=offline
3. Generate access and refresh token
Zoho's OAuth implementation uses the Bearer authentication scheme. This means that when making API calls, the access token has to be passed in the Authorization header with the prefix "Zoho-oauthtoken".
To generate an access and refresh token, make a POST request with the following URI.
After getting code by following the above step, make a POST request for the following
https://accounts.zoho.com/oauth/v2/token?code={authorization_code}&grant_type=authorization_code&client_id={client_id}&client_secret={client_secret}&redirect_uri={redirect_uri}
| Parameter | Description |
|---|---|
| code | code code obtained from the above step |
| client_id | Client ID obtained during Client Registration |
| client_secret | Client secret obtained during Client Registration |
| redirect_uri | This parameter should be the same redirect URL mentioned while adding a client. |
| grant_type | authorization_code |
In the response, you will get both access_token and refresh_token.
1. The access_token will expire after a particular period (as mentioned in expires_in parameter in the response).
2. The refresh_token is permanent and will be used to regenerate new access_token, if the current access token is expired.
Note: Each time a re-consent page is accepted, a new refresh token is generated. The maximum limit is 20 refresh tokens per user. If this limit is crossed, the first refresh token is automatically deleted to accommodate the latest one. This is done irrespective of whether the first refresh token is in use or not.
https://accounts.zoho.com/oauth/v2/token?code=1000.dd7exxxxxxxxxxxxxxxxxxxxxxxx9bb8.b6c0xxxxxxxxxxxxxxxxxxxxxxxxdca4&client_id=1000.0SRSxxxxxxxxxxxxxxxxxxxx239V&client_secret=fb01xxxxxxxxxxxxxxxxxxxxxxxxxxxxxxxx8abf&redirect_uri=https://id360.manageengine.com&grant_type=authorization_code
{
  "access_token": "1000.c656xxxxxxxxxxxxxxxxxxxxxxxx3fa9.a11fxxxxxxxxxxxxxxxxxxxxxxxx4b9e",
  "refresh_token": "1000.4038xxxxxxxxxxxxxxxxxxxxxxxx88a6.a450xxxxxxxxxxxxxxxxxxxxxxxxe62e",
  "token_type": "Bearer",
  "expires_in": 3600
}
4. Generate Access Token From Refresh Token
Access Tokens have limited validity. In most general cases, the access tokens expire in one hour. Until then, the access token has unlimited usage. Once it expires, your app will have to use the refresh token to request a new access token. Redirect to the following POST URL with the given parameters to get a new access token
https://accounts.zoho.com/oauth/v2/token?refresh_token={refresh_token}&client_id={client_id}&client_secret={client_secret}&grant_type=refresh_token
| Parameter | Description |
|---|---|
| refresh_token | REFRESH TOKEN, obtained from the above step |
| client_id | Client ID obtained during Client registration |
| client_secret | Client secret obtained during Client registration |
| grant_type | refresh_token |
https://accounts.zoho.com/oauth/v2/token?refresh_token=1000.8ecdxxxxxxxxxxxxxxxxxxxxx5cb7.4638xxxxxxxxxxxxxxxxxxxxxxebdc&client_id=1000.0SRSxxxxxxxxxxxxxxxxxxxx239V&client_secret=fb01xxxxxxxxxxxxxxxxxxxxxxxxxxxxxxxx8abf&redirect_uri=https://id360.manageengine.com&grant_type=refresh_token
{
  "access_token": "1000.e896xxxxxxxxxxxxxxxxxxxxxxxx3fa9.a78fxxxxxxxxxxxxxxxxxxxxxxxx4b9e",
  "token_type": "Bearer",
  "expires_in": 3600
}
5. Revoking a Refresh Token
To revoke a refresh token, call the following POST URL with the given parameters
https://accounts.zoho.com/oauth/v2/token/revoke?token={refresh_token}
| Parameter | Description |
|---|---|
| token | REFRESH TOKEN which is to be revoked |
https://accounts.zoho.com/oauth/v2/token/revoke?token=1000.8ecdxxxxxxxxxxxxxxxxxxxxxxxx5cb7.4638xxxxxxxxxxxxxxxxxxxxxxxxebdc
6. Calling An API
Access Token can be passed only in header and cannot be passed in the request param.
- Header name should be
Authorization - Header value should be
Zoho-oauthtoken {access_token}
curl --request GET \
  --url https://id360.manageengine.com/api/v1/users \
  --header 'Authorization: Zoho-oauthtoken 1000.41d9xxxxxxxxxxxxxxxxxxxxxxxxc2d1.8fccxxxxxxxxxxxxxxxxxxxxxxxx125f'
Scopes:
| Scopes | Scope operations available |
|---|---|
| user |
idmpod.user.READ
Show Action idmpod.user.CREATE Show Action idmpod.user.UPDATE Show Action idmpod.user.DELETE Show Action idmpod.user.WRITE Show Action idmpod.user.All Show Action |
| template |
idmpod.template.user.READ Show Action |